Perform a Backup and Undelect Data with Mobile Transfer

First, you should download this tool, Mobile Transfer. It is an excellent tool that can be used for file transferring, backing up phones of various brands and recovering them
Down Win
Down Mac 
Back up with Galaxy Phone

Step 1.Run Mobile Transfer
When you see this window, tap the light blue section, "Back Up Your Phone”in the lower right corner.
Step 2.Plug Samsung Phone in and Begin to Save Data
The process bar will tell you how it is going when the device is connected. In the middle, you are allowed to choose from "Contacts”, "Text Messages”, "Call Logs”, "Apps”, "Photos”, "Music” and "Videos”. The ones that you think are important should be selected. When that is done, "Start Copy”. At the end, press "OK”.

Note: Compared with the first program, this one can do it with SMS, call logs and apps.

Retrieve Data from Samsung Galaxy

Step 1.Choose "Restore From Backups”
When your mouse is on the icon, there will be six options, which are "MobileTrans”, "iTunes”, "iTunesMusic”, "Kies” and so forth. That is to say, you can utilize the files created by other software, even Samsung Kies. We may tap "MobileTrans” here.

Step 2.Take One of the Samsung Backup Files
On the left, your documents will be listed. Check one of them. (You can use the most updated one according to the time under the names.) And then, file types are still to be chosen. But, only the ones that you have saved are operable.
Step 3.Get Started to Transfer Files
Press the button "Start Copy” and all is easily finished. You can tick "Clear data before copy” if in need.




Backup and Restore Data with Samsung Kies

Store Files in PC

Samsung Kies is a Phone Suite for Samsung devices, with which you can manage files, do your backup and restore the phone. The software is available at the Samsung website. You may choose between Kies and Kies 3.

Step 1.Download and Launch Samsung Kies
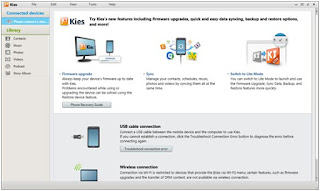
Now, you may click the hyperlink to have the application downloaded. And then set it up. When that is done, double click the icon and the newly-opened window will be like this.
Connect the phone to PC with a USB cable. (The example we take here is an old Galaxy S3.) It won't cost you long before the software detects your Samsung. Next, a pop-up box may tell you to update the firmware. Press "Cancel” and the information will be shown on your screen.

Step 2.Choose the Samsung Data that are to be Saved
See the categories under the name of "GT-I9300”? These are the ones which you can store in you computer. You can preview contacts, music, photos, videos that exist in your phone. Take "Contacts” for example, specific information can be ticked. Tap "Save to PC” and finally, confirm it by pressing "OK”.

Recover Samsung Data

Step 1.Select the Recoverable File Types
Beneath "Library”, there are several kinds of data, including contacts, audios and so on. Now, press whichever that you want to retrieve. For instance, if you would like to do contacts, the interface will tell you to open a file which you have ever saved as a backup. Press the button in the middle.
Choose the file folder and then open that document.
Step 2.Recover Information from Library
Check the ones that you prefer or simply all and "Transfer to device”. On the pop-up box, you may take one of the options—"Transfer all contacts” and "Transfer selected contacts”. After you click "OK”, another box will show up asking you to select the account on your phone that the numbers are imported to.
Note: If this is the first time you use Samsung Kies to restore the phone, you should open a backup file. And if not, the ones will be listed in the "Recently save contact file”.


Files
Kies 2.5.2 (65.72MB)
Kies 3.2.15072 (40.6 MB)


How to root SAMSUNG GALAXY CORE 2 (SM-355H)[SuperSu][2015]

How to root and install CWM for SAMSUNG GALAXY CORE 2 (SM-G355H) [Super Su][2015]
This tutorial is about how to root samsung galaxy core 2 with Super Su but not king user.
---Part-1---
first of all we have to install CWM recovery in our phone to install CWM recovery follow the steps

step-1: Download Odin3-v3.04.zip and CWM_6.0.3-1.zip file,extract both zip files.
step-2: Now connect your phone and make sure debugging mode is enabled from developer option of your phone and then open Odin and click on PDA and select the recovery.tar.md5(it is inside the CWM_6.0.3.zip you will see after you extract the zip) and click on start button.
step-3:It will take little time to complete the process and your phone will reboot. now your phone will be installed will custom recovery mode i.e CWM. now move to ::Part-2::

(installing CWM recovery mode in you phone is not only the reason to support the rooting using a zip file but it has very useful feature inside it,actually we are installing CWM recovery mode first because the stock reovery mode doesnot supports to root phone to install SuperSu.So to support everything we are installing CWM recovery mode).

---Part-2---
Now in this part we will root our phone.so follow the steps.

step-1: download the UPDATE-SuperSU-Pro-v2.46.zip and copy it to your sdcard.
step-2: switch-off your phone and then press volume-up buttom + home buttom + power buttom at once and the phone will turn on with a little red exclamation symbon on top-left side , wait for few seconds after that CWM recover mode will be open and then select install zip > choose zip from sdcard and select UPDATE-SuperSU-Pro-v2.46.zip and reboot your phone.
step-3: congrats!!! your phone is now rooted and SuperSu will be installed 
Files
File Type: zipUPDATE-SuperSU-Pro-v2.46.zip -(2.67 MB)
File Type: zipCWM_6.0.3-1.zip -(6.95 MB)
File Type: zipOdin3-v3.04.zip -(456.6 KB)

Removing write-protection using Diskpart

Plugged in USB drive, launch a command prompt. Do this by searching for cmd.exe in the Start menu (or Start screen in Windows 8). In Windows XP, click Start then Run, and type cmd.exe in the box.
NOTE: you may need to run Cmd.exe with administrator privileges if you see an “access is denied” message.
To do that, right-click on the shortcut and choose Run as administrator. In Windows 8, simply choose Command prompt (admin).
Now, type the following, pressing Enter after each command:
1. diskpart
2. list disk
3. select disk x (where x is the number of your USB flash drive – use the capacity to work out which one it is)
4. attributes disk clear readonly
5. clean
6. create partition primary
7. format fs=fat32  (you can swap fat32 for ntfs if you only need to use the drive with Windows         computers)
8. exit


How to erase a write-protected USB drive in the Registry using Regedit.exe

In any version of Windows from XP onwards, run Regedit.exe (searching regedit will usually show the program at the top of the list).
Navigate to the following key:
1. Computer\HKEY_LOCAL_MACHINE\SYSTEM\
2. CurrentControlSet\Control\StorageDevicePolicies

3. Double-click on the WriteProtect value in the right-hand pane of Regedit.exe. 
4. Change the Value data from 1 to 0 and click OK to save the change. 
5. Close Regedit and restart your computer. 
6. Connect your USB drive again, and you should find it is no longer write protected. 
You can now format the drive as normal by right-clicking on it in My Computer and choosing Format.
1. If you can’t find StorageDevicePolicies, you can try creating a key by right-clicking in the white space in the Control folder and choosing New -> Key and carefully entering the name.

2. Now double-click on the new key (folder) and right-click once again and choose New -> DWORD. 3. Name it WriteProtect and set its value to 0. 
4. Click OK, 
5. exit Regedit and reboot your computer.


Create bootable pendrive with cmd

Commands Used For making bootable USB :-
a) diskpart
b) list disk
c) select disk 1 ( if your USB is of no. 2 then use "select disk 2")
d) clean
e) create partition primary
f) select partition 1 ( if your USB is of no. 2 then use "select partition 2")
g) active
h) format fs=ntfs quick (for quick format) otherwise you can use "format fs=ntfs".
i) assign - as soon as you type this command your USB drive name will change automatically.
j) exit - to exit from diskpart not from command prompt.
k) extract your windows 7/8/10 file(.iso format) using winrar in pendrive.

How to check your Motherboard's Model Number and Company Name

1. Goto Run,
2. type CMD, 
3. CMD, 
4. then in Command Prompt type the command--- 
         i. wmic csproduct get name,identifying number,uuid----- 
         ii. and hit enter....