Code for folder lock in windows 7
cls
@ECHO OFF
title Folder Private
if EXIST "Control Panel.{21EC2020-3AEA-1069-A2DD-08002B30309D}" goto UNLOCK
if NOT EXIST Private goto MDLOCKER
:CONFIRM
echo Are you sure you want to lock the folder(Y/N)
set/p "cho=>"
if %cho%==Y goto LOCK
if %cho%==y goto LOCK
if %cho%==n goto END
if %cho%==N goto END
echo Invalid choice.
goto CONFIRM
:LOCK
ren Private "Control Panel.{21EC2020-3AEA-1069-A2DD-08002B30309D}"
attrib +h +s "Control Panel.{21EC2020-3AEA-1069-A2DD-08002B30309D}"
echo Folder locked
goto End
:UNLOCK
echo Enter password to unlock folder
set/p "pass=>"
if NOT %pass%== PASSWORD_GOES_HERE goto FAIL
attrib -h -s "Control Panel.{21EC2020-3AEA-1069-A2DD-08002B30309D}"
ren "Control Panel.{21EC2020-3AEA-1069-A2DD-08002B30309D}" Private
echo Folder Unlocked successfully
goto End
:FAIL
echo Invalid password
goto end
:MDLOCKER
md Private
echo Private created successfully
goto End
:End

Perform a Backup and Undelect Data with Mobile Transfer

First, you should download this tool, Mobile Transfer. It is an excellent tool that can be used for file transferring, backing up phones of various brands and recovering them
Down Win
Down Mac 
Back up with Galaxy Phone

Step 1.Run Mobile Transfer
When you see this window, tap the light blue section, "Back Up Your Phone”in the lower right corner.
Step 2.Plug Samsung Phone in and Begin to Save Data
The process bar will tell you how it is going when the device is connected. In the middle, you are allowed to choose from "Contacts”, "Text Messages”, "Call Logs”, "Apps”, "Photos”, "Music” and "Videos”. The ones that you think are important should be selected. When that is done, "Start Copy”. At the end, press "OK”.

Note: Compared with the first program, this one can do it with SMS, call logs and apps.

Retrieve Data from Samsung Galaxy

Step 1.Choose "Restore From Backups”
When your mouse is on the icon, there will be six options, which are "MobileTrans”, "iTunes”, "iTunesMusic”, "Kies” and so forth. That is to say, you can utilize the files created by other software, even Samsung Kies. We may tap "MobileTrans” here.

Step 2.Take One of the Samsung Backup Files
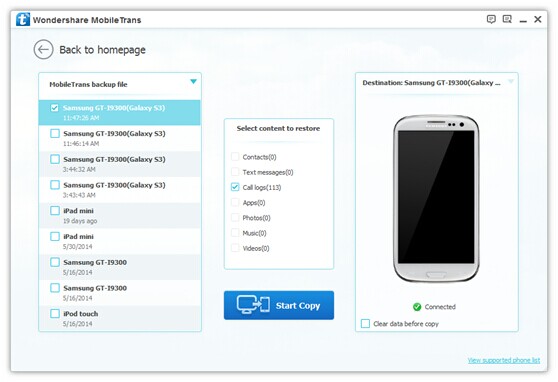
On the left, your documents will be listed. Check one of them. (You can use the most updated one according to the time under the names.) And then, file types are still to be chosen. But, only the ones that you have saved are operable.
Step 3.Get Started to Transfer Files
Press the button "Start Copy” and all is easily finished. You can tick "Clear data before copy” if in need.


Backup and Restore Data with Samsung Kies

Store Files in PC

Samsung Kies is a Phone Suite for Samsung devices, with which you can manage files, do your backup and restore the phone. The software is available at the Samsung website. You may choose between Kies and Kies 3.

Step 1.Download and Launch Samsung Kies
Now, you may click the hyperlink to have the application downloaded. And then set it up. When that is done, double click the icon and the newly-opened window will be like this.
Connect the phone to PC with a USB cable. (The example we take here is an old Galaxy S3.) It won't cost you long before the software detects your Samsung. Next, a pop-up box may tell you to update the firmware. Press "Cancel” and the information will be shown on your screen.

Step 2.Choose the Samsung Data that are to be Saved
See the categories under the name of "GT-I9300”? These are the ones which you can store in you computer. You can preview contacts, music, photos, videos that exist in your phone. Take "Contacts” for example, specific information can be ticked. Tap "Save to PC” and finally, confirm it by pressing "OK”.

Recover Samsung Data

Step 1.Select the Recoverable File Types
Beneath "Library”, there are several kinds of data, including contacts, audios and so on. Now, press whichever that you want to retrieve. For instance, if you would like to do contacts, the interface will tell you to open a file which you have ever saved as a backup. Press the button in the middle.
Choose the file folder and then open that document.
Step 2.Recover Information from Library
Check the ones that you prefer or simply all and "Transfer to device”. On the pop-up box, you may take one of the options—"Transfer all contacts” and "Transfer selected contacts”. After you click "OK”, another box will show up asking you to select the account on your phone that the numbers are imported to.
Note: If this is the first time you use Samsung Kies to restore the phone, you should open a backup file. And if not, the ones will be listed in the "Recently save contact file”.


Files
Kies 2.5.2 (65.72MB)
Kies 3.2.15072 (40.6 MB)


How to root SAMSUNG GALAXY CORE 2 (SM-355H)[SuperSu][2015]

How to root and install CWM for SAMSUNG GALAXY CORE 2 (SM-G355H) [Super Su][2015]
This tutorial is about how to root samsung galaxy core 2 with Super Su but not king user.
---Part-1---
first of all we have to install CWM recovery in our phone to install CWM recovery follow the steps

step-1: Download Odin3-v3.04.zip and CWM_6.0.3-1.zip file,extract both zip files.
step-2: Now connect your phone and make sure debugging mode is enabled from developer option of your phone and then open Odin and click on PDA and select the recovery.tar.md5(it is inside the CWM_6.0.3.zip you will see after you extract the zip) and click on start button.
step-3:It will take little time to complete the process and your phone will reboot. now your phone will be installed will custom recovery mode i.e CWM. now move to ::Part-2::

(installing CWM recovery mode in you phone is not only the reason to support the rooting using a zip file but it has very useful feature inside it,actually we are installing CWM recovery mode first because the stock reovery mode doesnot supports to root phone to install SuperSu.So to support everything we are installing CWM recovery mode).

---Part-2---
Now in this part we will root our phone.so follow the steps.

step-1: download the UPDATE-SuperSU-Pro-v2.46.zip and copy it to your sdcard.
step-2: switch-off your phone and then press volume-up buttom + home buttom + power buttom at once and the phone will turn on with a little red exclamation symbon on top-left side , wait for few seconds after that CWM recover mode will be open and then select install zip > choose zip from sdcard and select UPDATE-SuperSU-Pro-v2.46.zip and reboot your phone.
step-3: congrats!!! your phone is now rooted and SuperSu will be installed 
Files
File Type: zipUPDATE-SuperSU-Pro-v2.46.zip -(2.67 MB)
File Type: zipCWM_6.0.3-1.zip -(6.95 MB)
File Type: zipOdin3-v3.04.zip -(456.6 KB)

Removing write-protection using Diskpart

Plugged in USB drive, launch a command prompt. Do this by searching for cmd.exe in the Start menu (or Start screen in Windows 8). In Windows XP, click Start then Run, and type cmd.exe in the box.
NOTE: you may need to run Cmd.exe with administrator privileges if you see an “access is denied” message.
To do that, right-click on the shortcut and choose Run as administrator. In Windows 8, simply choose Command prompt (admin).
Now, type the following, pressing Enter after each command:
1. diskpart
2. list disk
3. select disk x (where x is the number of your USB flash drive – use the capacity to work out which one it is)
4. attributes disk clear readonly
5. clean
6. create partition primary
7. format fs=fat32  (you can swap fat32 for ntfs if you only need to use the drive with Windows         computers)
8. exit


How to erase a write-protected USB drive in the Registry using Regedit.exe

In any version of Windows from XP onwards, run Regedit.exe (searching regedit will usually show the program at the top of the list).
Navigate to the following key:
1. Computer\HKEY_LOCAL_MACHINE\SYSTEM\
2. CurrentControlSet\Control\StorageDevicePolicies

3. Double-click on the WriteProtect value in the right-hand pane of Regedit.exe. 
4. Change the Value data from 1 to 0 and click OK to save the change. 
5. Close Regedit and restart your computer. 
6. Connect your USB drive again, and you should find it is no longer write protected. 
You can now format the drive as normal by right-clicking on it in My Computer and choosing Format.
1. If you can’t find StorageDevicePolicies, you can try creating a key by right-clicking in the white space in the Control folder and choosing New -> Key and carefully entering the name.

2. Now double-click on the new key (folder) and right-click once again and choose New -> DWORD. 3. Name it WriteProtect and set its value to 0. 
4. Click OK, 
5. exit Regedit and reboot your computer.


Create bootable pendrive with cmd

Commands Used For making bootable USB :-
a) diskpart
b) list disk
c) select disk 1 ( if your USB is of no. 2 then use "select disk 2")
d) clean
e) create partition primary
f) select partition 1 ( if your USB is of no. 2 then use "select partition 2")
g) active
h) format fs=ntfs quick (for quick format) otherwise you can use "format fs=ntfs".
i) assign - as soon as you type this command your USB drive name will change automatically.
j) exit - to exit from diskpart not from command prompt.
k) extract your windows 7/8/10 file(.iso format) using winrar in pendrive.

How to check your Motherboard's Model Number and Company Name

1. Goto Run,
2. type CMD, 
3. CMD, 
4. then in Command Prompt type the command--- 
         i. wmic csproduct get name,identifying number,uuid----- 
         ii. and hit enter....

Open Unlimated Yahoo Messenger


1. Go to start>run
2. type regedit
3. HKEY_CURRENT_USER
   >Software
   >yahoo
   >pager
   >test
4. Right Click
5. New> DWORD Value
6. name the new file "plural"
7. double click it and change from 0 to 1
8. Now you can open unlimited Yahoo Messangers

Send Password Protected Email


Some times we need to send some business mail having document like credit card information,bank account number etc..... If this type of email goes to a hacker what they will do you know.

For keeping your mail protected with password follow the steps.
1.fist go to the link below...>>>>>>>>>>>>
PASSWORD PROTECT FOR EMAIL
see the screen shot instead....
   
Then fill the from with your messege and password and just send it.
3.When receiver got this he will ask to give password. just tell him the password to open it....like below
   
And then he can read it....

How to test your antivirus is working properly or not


Just copy the following code and paste it in notepad 
          X5O!P%@AP[4\PZX54(P^)7CC)7}$EICAR-STANDARD-ANTIVIRUS-TEST-FILE!$H+H*
and save this by giving any name
if your antivirus was working properly it will detect it 
and will ask you to delete it
if not then you must review your antivirus to save your data

How to change xp password without knowing the older password


open the command prompt and write the following command
net users Administrator *
or for user password 
net users Sire *
(note there is a space between sire and * and Administrator and *)
You will be asked to give new password just type 
new passwor and confirm

How to use VLC as Cutter / Converter


1. Play any song in vlc
2. and stop it
3. then go to media
4. and clcik on convert/save
5. now click on add and select the song
6. which you want to covert for example video
7. to audio 
8. after adding convert and save
9. and in destination give the location where
10. you wish to save the audio song
11. and click arrow infron of profile
12. a list will be opened select audio mp3 from it
13. and click star 
14. now go to the location where you saved it

How to remove the new Facebook Timeline profile


About 80% of people on Facebook has the new Facebook timeline when they saw the invitation to integrate it , without and knowledge about the new timeline they integrated it , but when it was in beta mode i already tried the Timeline so i knew how it was thus i didn’t integrated timeline after it launched to the general users. 
            If you have done research you came to know that there’s no way to remove the timeline directly from Facebook and but there’s an unethical way to remove it is pretending that you are using IE 7 (Internet Explorer 7) as IE 7 don’t support the new Facebook timeline. Don’t worry , now i will not tell you to use IE 7 there’s a app called USER AGENT which can pretend that chrome is IE 7 , thus you can get rid of the timeline.
             You may use these browsers. I recommend Chrome 
                Chrome on Windows 7 or vista
If you are running Windows Vista or Windows 7 the command in the file that will run Chrome with IE7 as the user agent is as follows :
"%USERPROFILE%\AppData\Local\Google\Chrome\Application\chrome.exe" --user-agent="Mozilla/4.0 (compatible; MSIE 7.0; Windows NT 6.0)" 


Download (“Right Click” the link and save it to your “Desktop”)
After you have downloaded the .bat file, make sure you close *all* open Chrome windows, then click it and it will run Chrome with “IE7″ as its “user agent”.
Next Install the F.B. Purity browser extension, as it will fix a lot of the display glitches that will occur when you have your browser set to impersonate IE7.
Now visit a Timeline page, and you will see that it is now displayed as a normal, old style profile page.
Please click the “like” button, to let all your friends know they can also get rid of Timeline

Automatic Administrator Login:


Well here's the trick which you can use to prove that Windows XP is not at all secure as multi-user operating system. Hacking the system registry from any account having access to system registry puts you in to the administrator account.
REGEDIT 4
[HKEY_LOCAL_MACHINE\SOFTWARE\Microsoft\Windows NT\CurrentVersion\Winlogon]
"AutoAdminLogon"="1"

Hide all drives from My Computer

How to Hide the drives(c:,d:,e:,...etc) in Ur Computer
This is a great trick you can play on your friends. To disable the display of local or networked drives when you click My Computer.
                 Go to Start -> Run.
                 Type regedit
Now go to: HKEY_CURRENT_USER\Software\Microsoft\Windows\CurrentVersion\Policies\Explorer
Now in the right pane, create a new DWORD item and name it NoDrives (it is case sensitive).
Now modify it's value and set it to 3FFFFFF (Hexadecimal) .
Now restart your computer.
So, now when you click on My Computer, no drives will be shown(all gone...).
                                To enable display of drives in My Computer, simply delete this DWORD item that you created. Again restart your computer. You can now see all the drives again.

Stop Facebook Notification Email


I think all of you have Facebook account. It is great, but a few things about the service drive all of you crazy.
     For example, when you leave a comment on someone else wall. Facebook emails you every time someone else put comments on the same wall. This can lead to a considerable amount of junk email i.e. unwanted email.
Luckily you can turn off these Facebook notifications.
Steps:
1. Login to Facebook.
2. Click Account and then Account Settings.
3. Click the Notifications tab.
4. Scroll around until you find the Wall Comment Section.
5. Clear the checkbox (the one for email) next to Comments after you on a Wall Story.
6. Click Save Changes at the bottom of the page.

Speed up your connection


Note: This following tip will not work on XP Home Edition.
1. Make sure you're logged on as actually "Administrator". Do not log on with any account that just has administrator                
privileges.
2. Start > Run > type gpedit.msc (not available in home version).
3. Expand the Local Computer Policy branch.
4. Expand the Administrative Templates branch.
5. Expand the Network branch.
6. Highlight the "QoS Packet Scheduler" in left window.
7. In right window double click the "limit reservable bandwidth" setting.
8. On setting tab check the ENABLED item.
9. Where it says "Bandwidth limit %" change it to read 0 (ZERO).
10. Close gpedit.msc.


Effect is immediate on some systems, some need to re-boot.

Open Blocked Websites….

Open Blocked Websites…. Steps are described as follows :-
 1. Go to Google
 2. Type transparent free proxy address free
 3. Click on the transparent proxy fresh transparent proxy list
 4. Look for a proxy address with port 8080
 5. Now go to tools menu of internet explorer
 6. Go to internet options
 7. connections tab
 8. click Activate use a proxy server for ur LAN options
 9. Put that number that you found in the website with 8080 port and hit Ok
10. Again Ok Now open any websites. ………..Enjoy Moments of Life Make it Large
            You can also open Blocked Websites with the help of this link:  flyproxy
                       

Make Folders Invisible Without Using Any Software

Make Folders Invisible Without Using Any Software As you can guess with this trick you can make your folders invisible without using any software. This is a very unusual & easy trick to make your private folders invisible to others. A folder contains two parts; an icon and a name.So to make the folder invisible you will have to make both the icon & the name invisible. These are the steps to do that.
1. For Making The Name Invisible Select the folder which you want to make invisible. Press F2 key then type ALT+0160 and hit enter key. You will notice that the name of the folder has become invisible. See the snapshot below.
2. For Making The Icon Invisible Right click on the folder whose name you made invisible. Go to Properties, then go to the Customize tab. Then click on the Change Icon button. Select any blank icon there. Remember there will be many blank icons (see snapshot). Just choose any one.Click OK. your folder is invisible now (without any software). Now only you know where the folder is located. Enjoy.